
To embark on building React Native applications for the Raspberry Pi, it’s essential to have a proper setup in place. This setup involves both the hardware and software installations necessary to create a conducive development environment.
Hardware Requirements and Setup for Raspberry Pi
To get started, you’ll need a Raspberry Pi 3 or newer. This ensures adequate processing power and connectivity options for most projects. Along with the Pi, you’ll need:
- A microSD card (16 GB or more recommended) with a suitable adapter.
- A reliable power supply.
- Optional but helpful: a Raspberry Pi case, a cooling solution, and any peripherals such as sensors or actuators depending on your project needs.
Software Prerequisites
Setting up the software involves several steps:
- Operating System: Install Raspberry Pi OS (formerly Raspbian) or any compatible lightweight Linux distribution that supports the ARM architecture. Raspberry Pi OS Lite is recommended for performance.
- Node.js and npm: Install Node.js, which is crucial for running and managing React Native applications. Use the NodeSource binaries for a stable version compatible with ARM processors.
- React Native CLI: Instead of the Expo CLI, use React Native CLI for better control over native dependencies. It’s installed via npm:
npm install -g react-native-cliInstalling React Native and Necessary Libraries
Once your Raspberry Pi is set up with the OS and Node.js, install React Native and other required libraries:
npm install react-native
Ensure that all dependencies specific to your project are also installed. For interfacing with hardware, libraries like node-gpio for GPIO pin control can be added based on your application’s requirements.

Designing Your First App
Planning the App
Before coding, plan your application thoroughly. Define its purpose, target user interactions, and overall functionality. For IoT projects, consider how the app will interact with external devices.
Creating a Simple React Native App
- Initialize a new React Native project:
react-native init MyRaspberryApp- Develop the UI: Use React Native components to build your app’s interface. Given the Raspberry Pi’s resource limitations, aim for a minimalistic design.
- Implement Functionality: Add the logic for the app’s operations, focusing on performance and responsiveness.
Debugging and Optimization
Debugging on Raspberry Pi can be challenging due to limited resources. Use remote debugging options available in React Native, and regularly monitor the app’s performance, making adjustments as necessary.
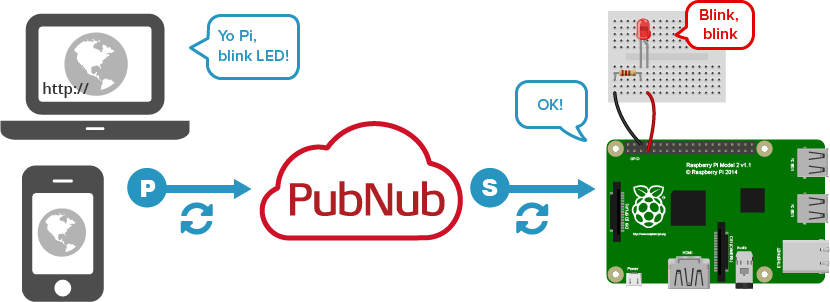
Connecting to IoT Devices
Integrating IoT devices with your React Native app on Raspberry Pi allows you to explore numerous applications in real-time data monitoring, home automation, and beyond. Here’s how you can make these connections effectively.
Overview of IoT Protocols
Choosing the right communication protocol is crucial for IoT applications. For Raspberry Pi, the most commonly used protocols include:
- MQTT (Message Queuing Telemetry Transport): A lightweight messaging protocol ideal for small sensors and mobile devices. It’s perfect for scenarios requiring low bandwidth or limited network reliability.
- HTTP/HTTPS: While more resource-intensive, HTTP is versatile for applications that aren’t constrained by power or processing capabilities.
- WebSockets: Useful for real-time communication between the Raspberry Pi and a web-based client.
Integrating React Native Apps with IoT Sensors and Actuators
To integrate IoT sensors and actuators with your React Native app, follow these steps:
- Choose and set up the appropriate sensors/actuators: For instance, temperature sensors, motion detectors, or light controls.
- Install necessary drivers and libraries on the Raspberry Pi to interact with these devices. Libraries such as
node-gpiocan be used for GPIO pin control. - Develop the communication layer: Implement the chosen protocol in your React Native app to send and receive data. Libraries like
mqtt.jscan be utilized for MQTT communication.
Example Project: Building a Temperature Monitoring App
Let’s walk through creating a basic temperature monitoring app using React Native on Raspberry Pi.
- Hardware Setup:
- Connect a DS18B20 temperature sensor to the GPIO pins of the Raspberry Pi.
- Set up the necessary resistors and wiring as per the sensor’s datasheet.
- Software Implementation:
- Install the
ds18b20library to interact with the temperature sensor. - Initialize a new React Native project and add code to read temperature data:
- Install the
const sensor = require('ds18b20-raspi');
const readTemp = () => {
  console.log('Current temperature is: ' + sensor.readSimpleC());
};
setInterval(readTemp, 2000); // Read temperature every 2 seconds
- App Interface:
- Develop a simple UI in React Native to display the temperature readings.
- Implement features to alert the user if temperatures go beyond set thresholds.
- Testing and Deployment:
- Test the app thoroughly in different environmental conditions.
- Optimize the code for better performance on the Raspberry Pi.
Advanced Topics and Best Practices
Utilizing Raspberry Pi’s GPIO Pins with React Native
The General Purpose Input/Output (GPIO) pins on the Raspberry Pi allow it to interact with a wide range of external devices. Here’s how you can leverage these for your React Native projects:
- Understanding GPIO Pin Management:
- Use libraries like
onofforrpi-gpioto manage GPIO pins via Node.js, which can interact with your React Native code. - Plan your pin usage carefully to avoid conflicts, especially when using multiple sensors or actuators.
- Use libraries like
- Example Use Case: Creating a home automation system that controls lights based on ambient light levels.
- Integrate photoresistors to detect light levels and LEDs as indicators or controllers.
- Write Node.js scripts to read from sensors and control GPIO pins accordingly, and connect these scripts with your React Native frontend.
Ensuring Security in IoT Applications
Security is paramount in IoT applications to protect sensitive data and prevent unauthorized access:
- Implement Secure Communication Protocols: Always use encrypted protocols like HTTPS or MQTTS when transmitting sensitive data.
- Regular Updates and Patch Management: Keep your Raspberry Pi’s software and all libraries up to date to avoid vulnerabilities.
- Authentication and Authorization: Implement robust authentication mechanisms to control access to IoT devices and the data they generate.
Performance Tips and Memory Management
Optimizing performance and managing memory efficiently are crucial due to the limited resources of the Raspberry Pi:
- Optimize React Native Performance:
- Reduce the complexity of your UI components.
- Avoid memory leaks by properly managing component lifecycle and unsubscribing from events or timers when components unmount.
- System Performance:
- Use lightweight versions of operating systems and libraries.
- Monitor system performance and consider overclocking the Raspberry Pi for demanding applications, ensuring adequate cooling to prevent overheating.
Community and Resources
Leading Forums and Communities
For ongoing support and to keep up with the latest developments in React Native and Raspberry Pi, engage with these communities:
- Raspberry Pi Forums: A great place for troubleshooting and project ideas.
- GitHub Repositories: Explore and contribute to projects that integrate React Native with Raspberry Pi.
- Stack Overflow: Useful for getting answers to specific coding questions or issues you encounter.
Recommended Resources
To further your knowledge and skills, consider these resources:
- Books:
- “Programming the Raspberry Pi” by Simon Monk for a deep dive into Raspberry Pi’s capabilities.
- “Learning React Native” by Bonnie Eisenman for a comprehensive guide on React Native.
- Online Tutorials and Courses:
- Coursera and Udemy offer courses on IoT, React Native, and embedded systems development.
- Blogs and YouTube channels by IoT and Raspberry Pi enthusiasts.
Conclusion
Combining React Native with Raspberry Pi for IoT and embedded applications opens up a plethora of opportunities for innovation and practical implementations. Whether you’re creating smart home devices or industrial monitoring systems, the flexibility and power of this combination are immense. With the right tools and a creative approach, there’s no limit to what you can build.